Gas line regulations protect homeowners from fire hazards, explosions, and carbon monoxide poisoning while ensuring proper fuel delivery to appliances. Understanding these codes helps you comply with local building departments, avoid costly violations, and maintain a safe home for your family. Whether you’re installing a new gas line, upgrading existing piping, or simply maintaining your system, knowing the rules is essential for any homeowner.
National Gas Line Codes
Table of Contents
The foundation of residential gas line regulation comes from two primary national model codes: the International Fuel Gas Code (IFGC) and the National Fuel Gas Code (NFPA 54/ANSI Z223.1). Local authorities adopt one of these codes as their baseline, then often add amendments specific to regional conditions, climate, or safety concerns. The IFGC is published by the International Code Council and focuses comprehensively on fuel gas safety and installation requirements, while NFPA 54 provides similar technical standards for materials, sizing, testing, and inspection procedures. Most jurisdictions also reference the National Electrical Code (NEC) for clearance requirements between gas piping and electrical components. Understanding which code your locality has adopted is the first step in any gas line project.
| Code/Standard | Publisher | Primary Focus | Typical Adoption |
|---|---|---|---|
| IFGC (International Fuel Gas Code) | International Code Council | Comprehensive fuel gas installation and safety | Most U.S. municipalities |
| NFPA 54 / ANSI Z223.1 | National Fire Protection Association | Materials, sizing, testing standards | Alternative to IFGC |
| NEC (National Electrical Code) | NFPA | Electrical clearances from gas lines | Electrical safety requirements |
| Local Amendments | City/County Building Departments | Region-specific modifications | Varies by jurisdiction |
| OSHA Standards | Occupational Safety and Health Administration | Worker safety during installation | Commercial and contractor work |
🔥 Gas Line Sizing Calculator
Calculate the minimum pipe diameter needed for your gas line installation based on appliance BTU loads, pipe length, and material type.
Appliance BTU Loads
Enter the BTU input rating for each gas appliance (found on appliance nameplate)
Pipe Specifications
Approved Gas Line Materials
Selecting the correct piping material is critical for code compliance and long-term safety. Black iron pipe (black steel) remains the most common and widely accepted material for indoor residential gas distribution, offering durability and resistance to damage. Corrugated stainless steel tubing (CSST) has become increasingly popular due to its flexibility and ease of installation, though it requires proper electrical bonding to prevent lightning-related failures. Steel pipe provides similar benefits to black iron and is also code-approved in most areas. Copper tubing (Grade K or L only) is permitted in some jurisdictions but often requires internal tinning when used with natural gas to prevent chemical reactions between the copper and sulfur compounds in the gas. Polyethylene (PE) pipe is approved for underground service lines from the meter to the foundation but must transition to approved rigid or flexible piping before entering the structure.
Galvanized steel pipe, once common, is now generally discouraged or explicitly prohibited for interior gas distribution because the zinc coating can flake off over time and clog appliance regulators. Always verify material approvals with your local building department, as some municipalities maintain stricter requirements than national codes.
| Material | Typical Use | Advantages | Limitations | Code Status |
|---|---|---|---|---|
| Black Iron Pipe | Indoor distribution | Very durable, widely accepted | Requires threading, heavier | Universally approved |
| CSST (Corrugated Stainless Steel Tubing) | Indoor distribution, retrofit work | Flexible, faster installation | Requires electrical bonding | Approved with proper bonding |
| Steel Pipe | Indoor distribution | Strong, long-lasting | Similar to black iron | Widely approved |
| Copper Tubing (Grade K/L) | Limited indoor use | Corrosion resistant | May require tinning, jurisdiction-specific | Approved in some areas |
| Polyethylene (PE) Pipe | Underground service lines | Flexible, corrosion resistant | Outdoor/underground only | Approved for buried service |
| Galvanized Steel | Legacy systems | Previously common | Zinc flaking issues | Generally prohibited for new work |
| Aluminum Pipe | Not recommended | Lightweight | Corrosion concerns | Not code-approved |
Permit Requirements and Process
Nearly all jurisdictions require permits for gas line installation, modification, or relocation work. The permitting process typically begins with submitting an application to your local authority having jurisdiction (AHJ), usually the building department or building inspection office. Your application must include a gas isometric drawing or schematic showing run lengths, materials used, all fittings, pipe sizes, total BTU load, and the precise locations of shutoff valves and sediment traps. The building department will review your plans for code compliance before issuing the permit.
Once the permit is issued, you'll schedule inspections at critical stages: a rough-in inspection before covering any piping, a pressure test (often witnessed by the inspector), and a final inspection after appliance connections are complete. Never cover, bury, or conceal gas lines until they've been inspected and approved. Underground installations require additional verification of burial depth and tracer wire installation. Permit fees vary by jurisdiction but are a small fraction of total project costs. Some areas allow homeowners to pull permits for work on their own primary residence, but work must still meet all code requirements and pass inspection.
| Permit Stage | Required Documentation | Typical Timing | Inspector Checks |
|---|---|---|---|
| Permit Application | Gas isometric, materials list, BTU calculations | Before starting work | Plan compliance with codes |
| Rough-In Inspection | Exposed piping before covering | After installation, before concealment | Proper materials, sizing, supports, routing |
| Pressure Test | Test gauge readings, hold time | During or after rough-in | System holds required pressure without leaks |
| Final Inspection | All appliances connected | After all work complete | Proper connections, shutoffs, sediment traps, labeling |
| Underground Inspection | Depth verification, tracer wire | Before backfilling trench | Burial depth, PE pipe condition, corrosion protection |
Gas Pipe Sizing Requirements
Proper gas pipe sizing ensures adequate fuel delivery to all appliances while maintaining safe operating pressure throughout the system. Residential gas systems typically operate at low pressure, usually 0.5 pounds per square inch (PSI) or less, which equals approximately seven inches of water column. Codes mandate the use of published sizing tables that correlate pipe length, gas flow capacity measured in cubic feet per hour (CFH), and required pipe diameter. The "longest length method" is the standard approach: measure the distance from the gas meter to the most remote appliance outlet, then use this length in the sizing table to determine the minimum pipe diameter needed to serve all appliances operating simultaneously.
Undersizing creates pressure drops that starve appliances of fuel, causing incomplete combustion, sooting, and potential carbon monoxide production. Oversizing wastes materials and money without providing safety benefits. Professional sizing requires summing the BTU input ratings of all gas appliances, converting to CFH (dividing by the heating value of your gas supply, typically 1,000 BTU per cubic foot for natural gas), then consulting the code tables for your specific pipe material, length, and pressure. This calculation must account for every fitting and change in direction, as each creates friction loss that reduces pressure.
| Total BTU Load | Equivalent CFH (Natural Gas) | Pipe Length | Minimum Pipe Diameter (Black Iron) | Minimum Pipe Diameter (CSST) |
|---|---|---|---|---|
| 50,000 BTU | 50 CFH | 20 feet | 3/4 inch | 3/8 inch EHD |
| 100,000 BTU | 100 CFH | 20 feet | 1 inch | 1/2 inch EHD |
| 150,000 BTU | 150 CFH | 20 feet | 1 inch | 5/8 inch EHD |
| 50,000 BTU | 50 CFH | 50 feet | 3/4 inch | 1/2 inch EHD |
| 100,000 BTU | 100 CFH | 50 feet | 1 inch | 5/8 inch EHD |
| 150,000 BTU | 150 CFH | 50 feet | 1-1/4 inch | 3/4 inch EHD |
| 200,000 BTU | 200 CFH | 50 feet | 1-1/4 inch | 3/4 inch EHD |
Note: Values are approximate. Always use official code sizing tables for your jurisdiction and specific conditions.
Pressure Testing Standards
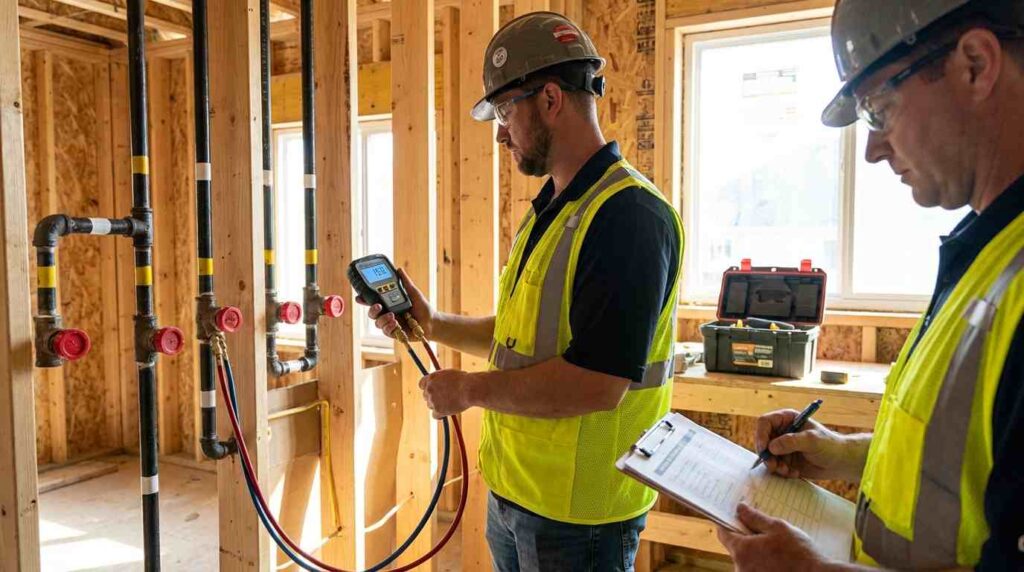
Pressure testing verifies the integrity of gas piping before it's placed into service, catching leaks before gas flows through the system. Codes require testing at pressures higher than normal operating pressure to ensure a safety margin. Typical test pressures range from 10 to 25 PSI for rigid piping systems, held for a specified duration (often 30 minutes to one hour) with no measurable pressure drop. CSST installations follow manufacturer-specific test procedures that may differ from rigid pipe requirements.
The testing procedure involves sealing all outlets, connecting a pressure gauge at an accessible location, pressurizing the system with air or inert gas (never use combustible gas for testing), and monitoring for pressure loss. Even a small pressure drop indicates a leak that must be located and repaired before retesting. Many jurisdictions require the building inspector to witness the pressure test. After passing the pressure test and final inspection, the system receives a leak test at actual working pressure using approved leak detection solution or electronic leak detectors before the gas utility is authorized to provide service.
| Test Type | Test Medium | Test Pressure | Hold Duration | Acceptance Criteria |
|---|---|---|---|---|
| Initial Pressure Test (Rigid Pipe) | Air or nitrogen | 10-25 PSI | 30-60 minutes | Zero pressure drop |
| CSST System Test | Air or nitrogen | Per manufacturer specs | 30 minutes minimum | Zero pressure drop |
| Working Pressure Leak Test | Natural gas at service pressure | 7 inches water column (0.25 PSI) | Continuous during inspection | No bubble formation with leak solution |
| Underground Line Test | Air or nitrogen | 10 PSI minimum | 30 minutes | Zero pressure drop |
| Post-Repair Retest | Air or nitrogen | Same as initial test | 30-60 minutes | Zero pressure drop after repairs |
Safety Devices and Components
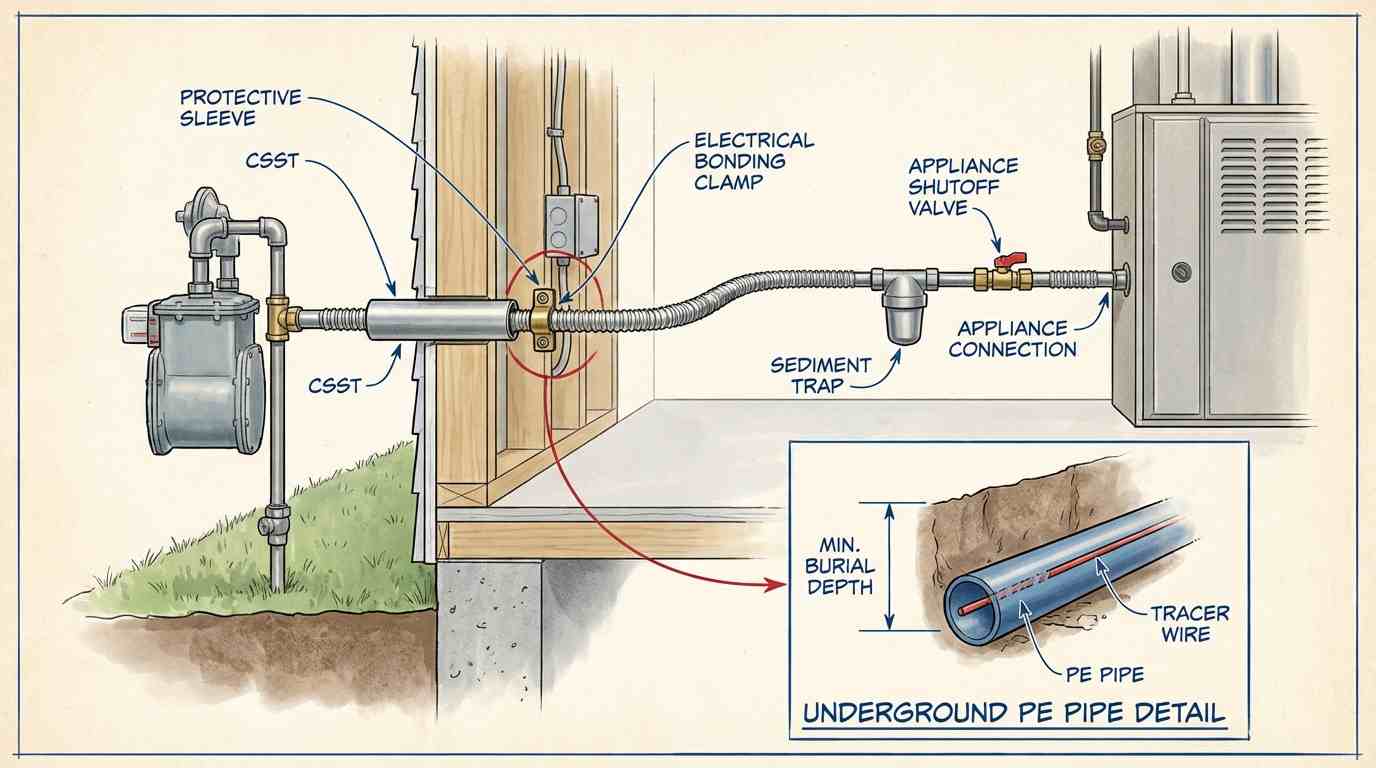
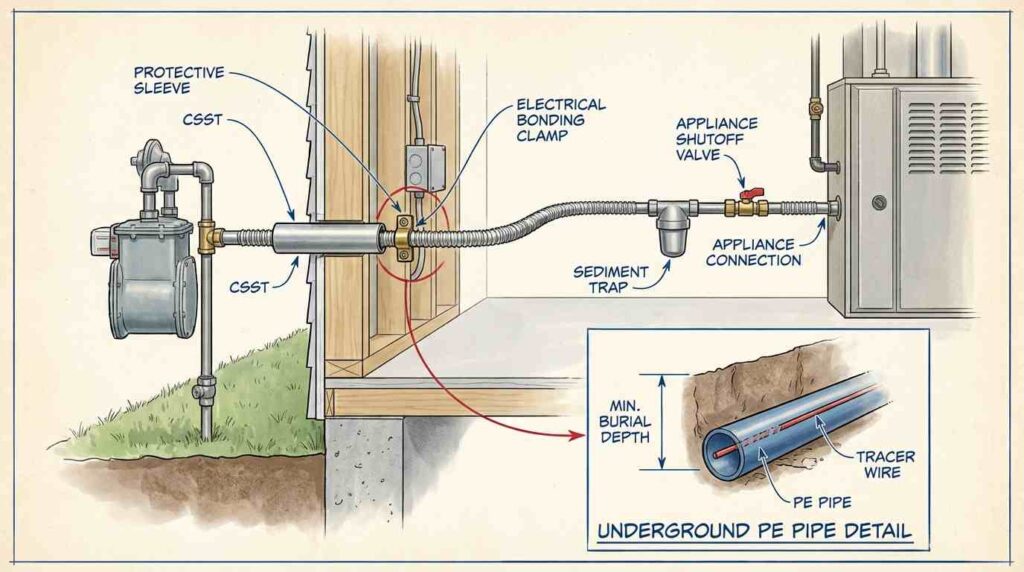
Code-mandated safety devices protect against gas leaks, appliance malfunctions, and other hazards. Every gas appliance must have a dedicated shutoff valve located within a specified distance, typically within six feet and in the same room as the appliance for easy emergency access. Shutoff valves must be of an approved type, typically ball valves or plug valves that can be operated with a quarter-turn.
A sediment trap (also called a drip leg) is required on the gas supply line immediately before each appliance connection. This simple device consists of a capped vertical section of pipe that allows any dirt, scale, or moisture in the gas to settle out before reaching the appliance regulator. Sediment traps prevent debris from damaging sensitive appliance controls and must be installed in a specific configuration with the capped nipple below the horizontal supply line.
CSST installations require proper electrical bonding and grounding to prevent damage from lightning strikes or electrical faults. A bonding clamp connects the CSST to the building's electrical grounding system, typically at the point where the CSST attaches to rigid piping. Gas piping must maintain required clearances from electrical wiring, typically at least six inches separation. Many jurisdictions also require seismic shutoff valves in earthquake-prone regions, which automatically close the gas supply if ground motion exceeds a set threshold.
| Safety Component | Purpose | Code Requirement | Typical Location |
|---|---|---|---|
| Appliance Shutoff Valve | Allow gas isolation for service or emergency | Within 6 feet of each appliance, same room | Immediately upstream of appliance connection |
| Sediment Trap (Drip Leg) | Capture debris and moisture | Required on supply to each appliance | Vertical drop before appliance inlet |
| CSST Bonding | Prevent lightning/electrical damage | Required for all CSST systems | Where CSST connects to rigid piping |
| Main Shutoff Valve | Isolate entire system | Required at meter or point of entry | At gas meter or service entry point |
| Seismic Shutoff Valve | Automatic closure during earthquake | Required in seismic zones (varies by locality) | At meter or main supply line |
| Pressure Regulator | Maintain safe operating pressure | Typically at meter (utility-supplied) | Service entry point |
| Excess Flow Valve | Stop flow if line breaks | Often required for outdoor appliances | In supply line to outdoor equipment |
Installation Best Practices
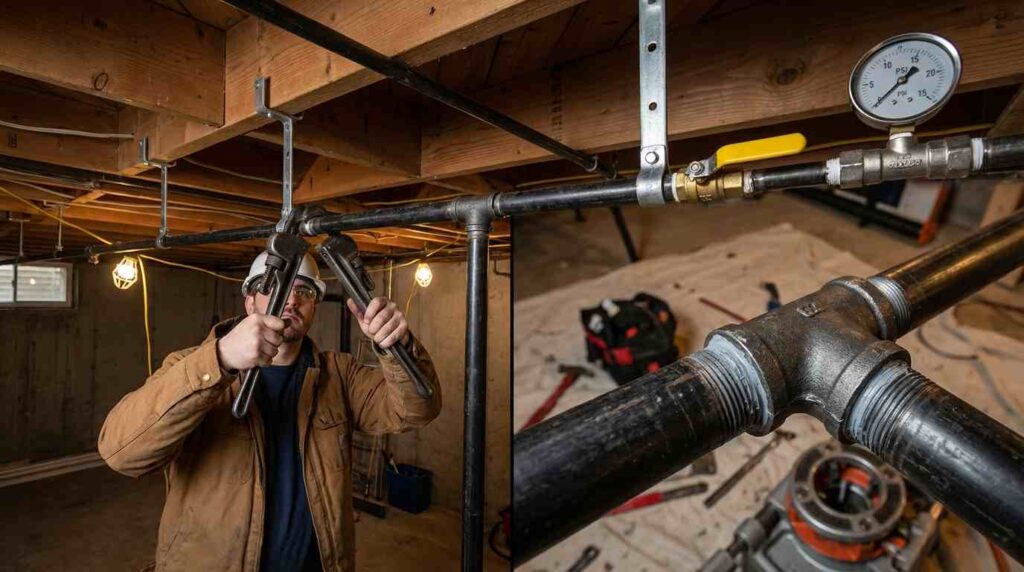
Following best practices ensures code compliance and long-term system reliability. Gas piping must be properly supported at specified intervals to prevent sagging and stress on joints; rigid piping typically requires support every eight to ten feet for horizontal runs. Supports must not damage protective coatings on pipes or allow galvanic corrosion between dissimilar metals. All joints must use approved methods: threaded connections with approved pipe thread sealant or tape for rigid pipe, or mechanical fittings per manufacturer instructions for CSST.
Never paint or coat gas piping in ways that conceal identification markings or prevent future inspection. Gas lines should be clearly identified, especially where they might be mistaken for water lines or other utilities. Maintain adequate clearances from heat sources, electrical wiring, and structural elements. Avoid running gas lines through walls or floors where they could be damaged by future renovations or structural work without proper protection. Never hang objects from gas pipes or use them as supports for other building components.
When working near existing gas lines, use extreme caution to avoid damaging the pipe, joints, or protective coatings. Before any digging or excavation, contact your local utility location service (811 in the United States) to have underground gas lines marked. This free service prevents dangerous strikes on buried gas mains and service lines.
| Installation Aspect | Best Practice | Common Mistake to Avoid | Code Reference |
|---|---|---|---|
| Pipe Support | Support every 8-10 feet for horizontal runs | Inadequate or missing supports causing sag | IFGC/NFPA 54 support requirements |
| Joint Sealing | Approved pipe thread sealant or yellow PTFE tape | Using white plumbing tape or unapproved sealants | Material compatibility requirements |
| Clearances | Maintain 6+ inches from electrical wiring | Running gas lines too close to electrical | NEC clearance requirements |
| Identification | Clearly label gas piping | Painting over or removing identification | Piping identification standards |
| Protection | Sleeve pipes through walls/floors | Leaving pipe vulnerable to damage | Penetration protection requirements |
| Underground Burial | Bury PE pipe at required depth with tracer wire | Insufficient depth or no tracer wire | Underground installation standards |
| CSST Installation | Follow manufacturer instructions exactly | Improper bending radius or support spacing | Manufacturer listing requirements |
| Testing Access | Leave test connection accessible | Sealing all test ports permanently | Testing and inspection access |
Professional vs DIY Installation
While some homeowners possess the skills for gas line work, codes and safety considerations strongly favor professional installation in most cases. Licensed gas fitters or plumbers have training in code requirements, proper sizing calculations, pressure testing procedures, and safe work practices. They carry insurance that protects homeowners from liability if accidents occur during installation. Many jurisdictions require licensed contractors for gas work, prohibiting homeowner installations entirely or limiting DIY work to specific scenarios.
Tasks that absolutely require professional installation include sizing and installing new gas lines, routing gas piping through walls or underground, CSST installation and bonding, meter upgrades or regulator changes, and any pressure testing beyond simple connector checks. Even in jurisdictions that permit homeowner work, the complexity of sizing calculations, the critical importance of leak-free joints, and the catastrophic consequences of errors make professional installation a wise investment.
Simple tasks that experienced homeowners might handle include replacing a visible section of damaged pipe (after shutoff and with proper permits), installing a new appliance shutoff valve on existing pipe, or extending an exposed line a short distance in an unfinished area. Even these tasks require pulling permits, proper materials, and passing inspection. Never attempt gas work if you're uncertain about any aspect of the job; the risks far outweigh any potential savings.
| Project Type | DIY Appropriate? | Professional Required? | Key Considerations |
|---|---|---|---|
| New gas line installation | No | Yes | Sizing calculations, code compliance, safety |
| Extending existing line | Maybe (simple exposed runs only) | Recommended | Permit required, inspection needed |
| CSST installation | No | Yes | Bonding requirements, special tools needed |
| Underground gas line | No | Yes | Excavation safety, burial depth, PE pipe expertise |
| Appliance connector replacement | Yes (if exposed and simple) | Optional | Must use approved connectors, leak test after |
| Meter or regulator work | No | Yes (often utility-only) | Utility involvement required |
| Pressure testing | No | Yes | Specialized equipment and expertise needed |
| Emergency leak repair | No | Yes (emergency service) | Evacuate and call professionals immediately |
Cost Factors and Budgeting
Understanding gas line installation costs helps homeowners budget appropriately and evaluate contractor quotes. Material costs vary significantly by type: black iron pipe typically costs $2-$5 per linear foot installed, while CSST runs $3-$8 per foot depending on diameter. Underground polyethylene service lines cost $8-$15 per foot including excavation and burial. Permit fees generally range from $50 to $300 depending on project scope and local fee structures.
Labor typically represents the largest cost component, with licensed gas fitters charging $75-$150 per hour depending on region and complexity. A simple 20-foot extension to serve one new appliance might cost $500-$800 total, while running a new line from the meter to the opposite side of a house could exceed $2,000-$3,500. Significant underground work or service line installation from the street can reach $5,000-$8,000 or more.
New regulations in some states affect cost structures significantly. In New York, the elimination of the "100-foot rule" in December 2026 means homeowners will pay 100% of gas service line installation costs themselves, estimated at around $6,500 per connection, rather than having utility companies subsidize these costs. Factor inspection fees, potential repairs if work fails inspection, and system testing into your budget.
| Cost Component | Typical Range | Factors Affecting Cost |
|---|---|---|
| Black Iron Pipe (materials + installation) | $2-$5 per linear foot | Diameter, complexity, accessibility |
| CSST (materials + installation) | $3-$8 per linear foot | Diameter, length, bonding requirements |
| Underground PE Line | $8-$15 per linear foot | Depth, soil conditions, length |
| Appliance Shutoff Valve | $50-$150 each | Type, location, accessibility |
| Sediment Trap | $30-$75 each | Pipe size, configuration |
| Labor (Licensed Professional) | $75-$150 per hour | Region, contractor experience, project complexity |
| Permits | $50-$300 per project | Jurisdiction, project scope |
| Pressure Testing | $100-$250 | Included with installation or separate |
| Simple Extension (20 feet) | $500-$800 total | One appliance, exposed location |
| Whole-House New Line | $2,000-$3,500 total | Multiple appliances, concealed routing |
| Service Line from Street | $5,000-$8,000+ total | Distance, excavation, regulatory requirements |
Regional Variations and Special Requirements
Gas line regulations vary significantly by state and locality, with some regions implementing requirements far more stringent than national model codes. Earthquake-prone areas like California often mandate seismic shutoff valves and special flexible connectors at appliances. Coastal regions may require enhanced corrosion protection for underground piping. Cold-climate jurisdictions might specify deeper burial depths for underground lines to prevent frost heaving.
New York State implemented sweeping changes effective January 1, 2026, prohibiting natural gas or propane equipment and associated piping in new construction for buildings seven stories or less. This all-electric mandate expands to all new buildings by January 1, 2029. Existing homes can continue using and repairing gas systems, and the prohibition doesn't apply to renovations or additions to existing structures. Similar bans have been enacted or proposed in various municipalities across the country, particularly in California and the Pacific Northwest.
Always verify your local requirements with your building department before planning any gas line project. Code adoption cycles mean your area might be operating under an older or newer code edition than neighboring jurisdictions. Local amendments can affect materials, sizing methods, inspection procedures, and more.
| Region/Jurisdiction | Special Requirements | Effective Date | Scope |
|---|---|---|---|
| New York State (statewide) | No gas/propane in new construction ≤7 stories | January 1, 2026 | New construction only, not existing buildings |
| New York State (all buildings) | All-electric requirement for all new buildings | January 1, 2029 | All new construction |
| California (seismic zones) | Seismic shutoff valves required | Ongoing | New installations in high-risk zones |
| Coastal Areas | Enhanced corrosion protection for underground piping | Varies by locality | Underground installations |
| Cold Climate Regions | Deeper burial depth (often 48+ inches) | Ongoing | Underground gas lines |
| High Wind Zones | Additional securing and protection requirements | Ongoing | Exposed exterior piping |
Maintenance and Ongoing Compliance
Proper maintenance keeps gas systems safe and code-compliant throughout their service life. Annual professional inspections can detect corrosion, damaged pipe coatings, loose fittings, improper modifications, or deteriorating flexible connectors before they cause leaks. Homeowners should perform regular visual inspections of exposed piping, looking for rust, damage, or signs of stress. Check that protective coatings on CSST remain intact and that bonding connections are secure.
Never modify gas piping without permits and inspections, even for seemingly minor changes. Adding an appliance or relocating equipment requires verifying adequate pipe sizing, installing proper shutoffs and sediment traps, and passing inspection. Ensure nothing is tied to or hanging from gas pipes, and protect them from damage during other home improvement projects. Be alert for warning signs of gas leaks: the distinctive sulfur/rotten egg odor added to natural gas, hissing sounds near pipes or appliances, dead vegetation over underground lines, or higher-than-normal gas bills.
If you suspect a leak, evacuate immediately, avoid creating sparks or flames, leave doors open as you exit, and call your gas utility's emergency line and 911 from a safe location away from the building. Never attempt to locate or repair leaks yourself; trained professionals have the tools and expertise to safely address gas emergencies.
| Maintenance Task | Frequency | Performed By | What to Check |
|---|---|---|---|
| Visual Inspection of Exposed Piping | Monthly | Homeowner | Rust, damage, loose fittings, moisture |
| Professional System Inspection | Annually | Licensed technician | Leaks, corrosion, component condition, compliance |
| CSST Bonding Verification | Annually | Licensed technician | Bond integrity, corrosion at connections |
| Appliance Connector Inspection | Annually | Homeowner or technician | Cracks, kinks, age (replace every 10 years) |
| Sediment Trap Cleaning | As needed (during appliance service) | Technician | Debris accumulation |
| Shutoff Valve Operation Test | Annually | Homeowner | Valve moves freely, fully closes |
| Leak Detection (if suspected) | Immediately | Emergency professional | Entire system checked with detection equipment |
| Underground Line Check | After excavation nearby | Professional | Pipe integrity, coating condition |
Q1: What permits are required for residential gas line installation?
A1: Nearly all jurisdictions require building permits for gas line installation, modification, or relocation. You must submit a gas isometric drawing showing pipe runs, materials, sizes, BTU loads, and shutoff valve locations to your local building department, then schedule rough-in, pressure test, and final inspections before the system can be activated.
Q2: What are the approved materials for residential gas piping?
A2: Approved materials include black iron pipe, CSST (corrugated stainless steel tubing with proper bonding), steel pipe, copper tubing (Grade K or L, often requiring tinning), and polyethylene pipe for underground service lines only. Galvanized steel is generally prohibited for new installations due to zinc flaking issues.
Q3: How do I determine the correct gas pipe size for my home?
A3: Gas pipe sizing requires calculating total BTU load of all appliances, converting to cubic feet per hour (CFH), measuring the longest pipe run length from meter to farthest appliance, then consulting code-approved sizing tables specific to your pipe material, pressure, and length. Professional sizing is strongly recommended to ensure adequate capacity and code compliance.
Q4: What is a gas line pressure test and why is it required?
A4: Pressure testing verifies gas piping integrity before service activation by pressurizing the sealed system to 10-25 PSI with air or nitrogen for 30-60 minutes and checking for pressure drops indicating leaks. Many jurisdictions require building inspectors to witness the pressure test, and it's mandatory before the utility provides gas service.
Q5: Can homeowners install their own gas lines or is a professional required?
A5: While some jurisdictions permit homeowner gas work on their primary residence, professional installation is strongly recommended and often required by local codes. Licensed gas fitters have specialized training in sizing, testing, and code compliance. Tasks requiring professionals include new installations, underground work, CSST installation, and all pressure testing.